Paxman 12YJ Flywheel Modification
Read more on how we helped this client below and discover how we can help you too...

Background
The flywheel on the client’s Paxman 12YJ engine was to be inspected and machined to accommodate the new stud arrangement for fitting the starter ring.

Solution
Firstly, a jig was manufactured to locate the bore of the flywheel. The jig was then fitted to the borer machine and clocked in order to locate the centre.
The flywheel was then placed on the jig. This was then clocked on the outside diameter and the spigot diameter to check the runout. This was found to be within 0.003”.

Clocking the spigot of the flywheel and the outside diameter
The table was then moved out to the PCD of the holes using the measurement scale on the handle. An original, un-helicoiled thread was then picked up for a radial location using the rotary table. The machining process was started and the threaded holes on the first half of the flywheel were counter-bored and aligned.
It was found that the counter-bores on the other half of the flywheel (which had all been Helicoiled) would not line up due to the fact that the threaded holes were slightly out of position on the PCD. However, these were mainly out of position radially.
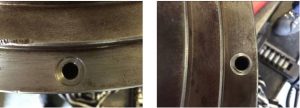
Hole concentric to the counter-bore and hole off-centre to counter-bores
It was believed that when the holes were previously repaired, the Helicoils were not made central. This was the reason that they were not on the correct PCD. This would have also contributed to the difficulties of fitting the starter ring and its concentricity.
All of the original threaded holes and dowel holes were plugged, and a light witness cut was taken in order to clean this up.
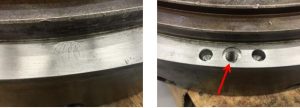
Threaded and dowelled holes plugged, and new holes drilled and tapped.
New holes were then drilled and tapped in between the originals. The threaded holes were counter-bored to suit the special studs. The special studs were then fitted to the flywheel.
Special studs fitted to the flywheel.
The original clearance holes in the starter ring were reamed out to give a 0.002”- 0.004” clearance with the studs fitted.

Clearances recorded for starter ring
The teeth of the starter ring were hardness checked with a calibrated portable hardness tester (TH110). The teeth were found to be within the required specifications of 40 – 55 HRC.
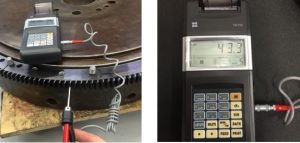
Starter ring hardness test; Readings taken within specification
The below figures were taken from the THF110 hardness tester:

It was believed that the face of the ring may have been hardened due to the heat colour. Therefore, this was also tested. The tester showed an E4 reading, meaning that the hardness was below the minimum range of 20.6 HRC. This was also the case for the root of the teeth, confirming that only the teeth had been hardened as per the OEM specifications.
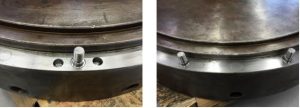
The starter ring and flywheel were then crack tested via MPI (Magnetic Particle Inspection) method. No issues were recorded throughout this process.
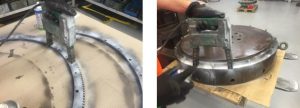
Crack testing of the starter ring and flywheel
The flywheel was then fitted to the spare engine currently being held in Bartech stores for testing. This was clocked for runout on the outside diameter and on the coupling face. The runout was recorded at 0.002” and 0.0045” respectively.
The following readings were taken during the concentricity checks on the starter ring face:
+0.002”
+0.003”
0 (Top Split)
-0.003” (Bottom Split)
-0.005” (Bottom Split)

Flywheel fitted to engine and being tested.
The starter motor was also fitted. 0.015” shims were placed behind the starter motor bracket and the backlash was checked using lead wire in eight different locations, including both sides of the split.
The backlash ranged from 0.0180”-0.0225”, confirming that the starter ring was concentric to the flywheel.
The following illustration shows the backlashes that were recorded throughout this process:
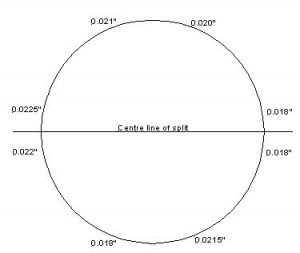
Backlash recordings
The engine was then started a total of ten times without any issues. The final five starts were filmed to show that the starter motor Bendix was returning as it should. This video was subsequently sent to the client.

Outcome
The flywheel was prepared for despatch to the platform in preparation for a Bartech engineer to attend and fit to the engine.
If you have an issue with your Paxman 12YJ, any other engine or need advice, give us a call on 01206 673101 or email us at info@bartechmarine.com, we’re more than happy to help.
Got a problem like this that you need help with? See how we can help!
Find out moreYou might also find these case studies interesting...
-
Case study
Twiflex clutch repair and refurbishment
Find out more -
Case study
Detroit 8V-71 BMSN1496 Fully dismantle, clean and inspect the torque converter
Find out more -
Case study
Investigate oil leak at turbine end of the Holset 4MF turbocharger on a coolant engine
Find out more
If you’re after a trustworthy engine specialist with an excellent track record for your job then let's get started
Get support now 01206 673101 24hProud to be supporting:

Engineer Resource Vol. 2 is now out for FREE download. Get your copy now!
A collection of articles to help you improve engine reliability, performance and safety specifically for engineers, brought to you by Bartech Marine. Simply enter your email below to get instant access.
By completing this form you are agreeing to our privacy policy.